Building My Resume in HTML using Eleventy
Like many before me, I've built and rebuilt my resume many times over the years. I've used many different approaches, including LaTeX and visual editors, in search of something that fulfilled my aspirational criteria:
- the development experience should be pleasant,
- the content and layout should work well with version control, and
- the output should be easy to access.
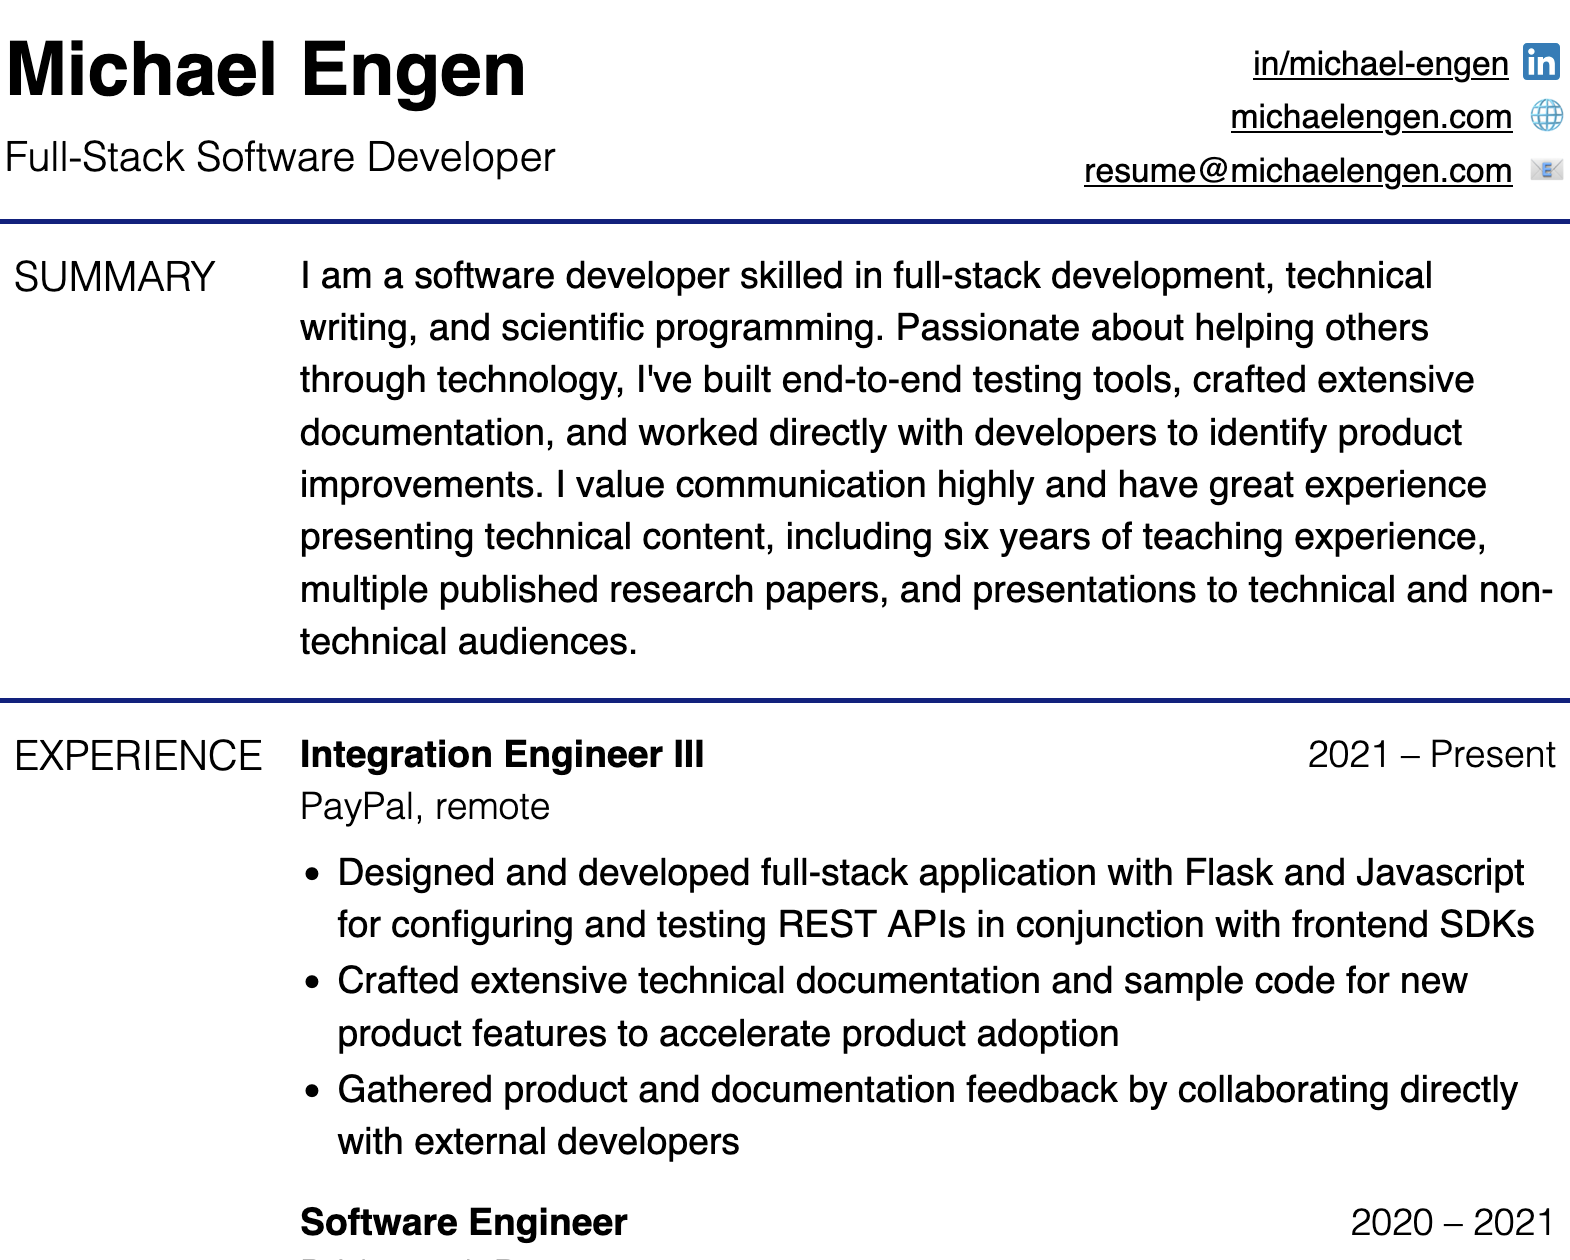
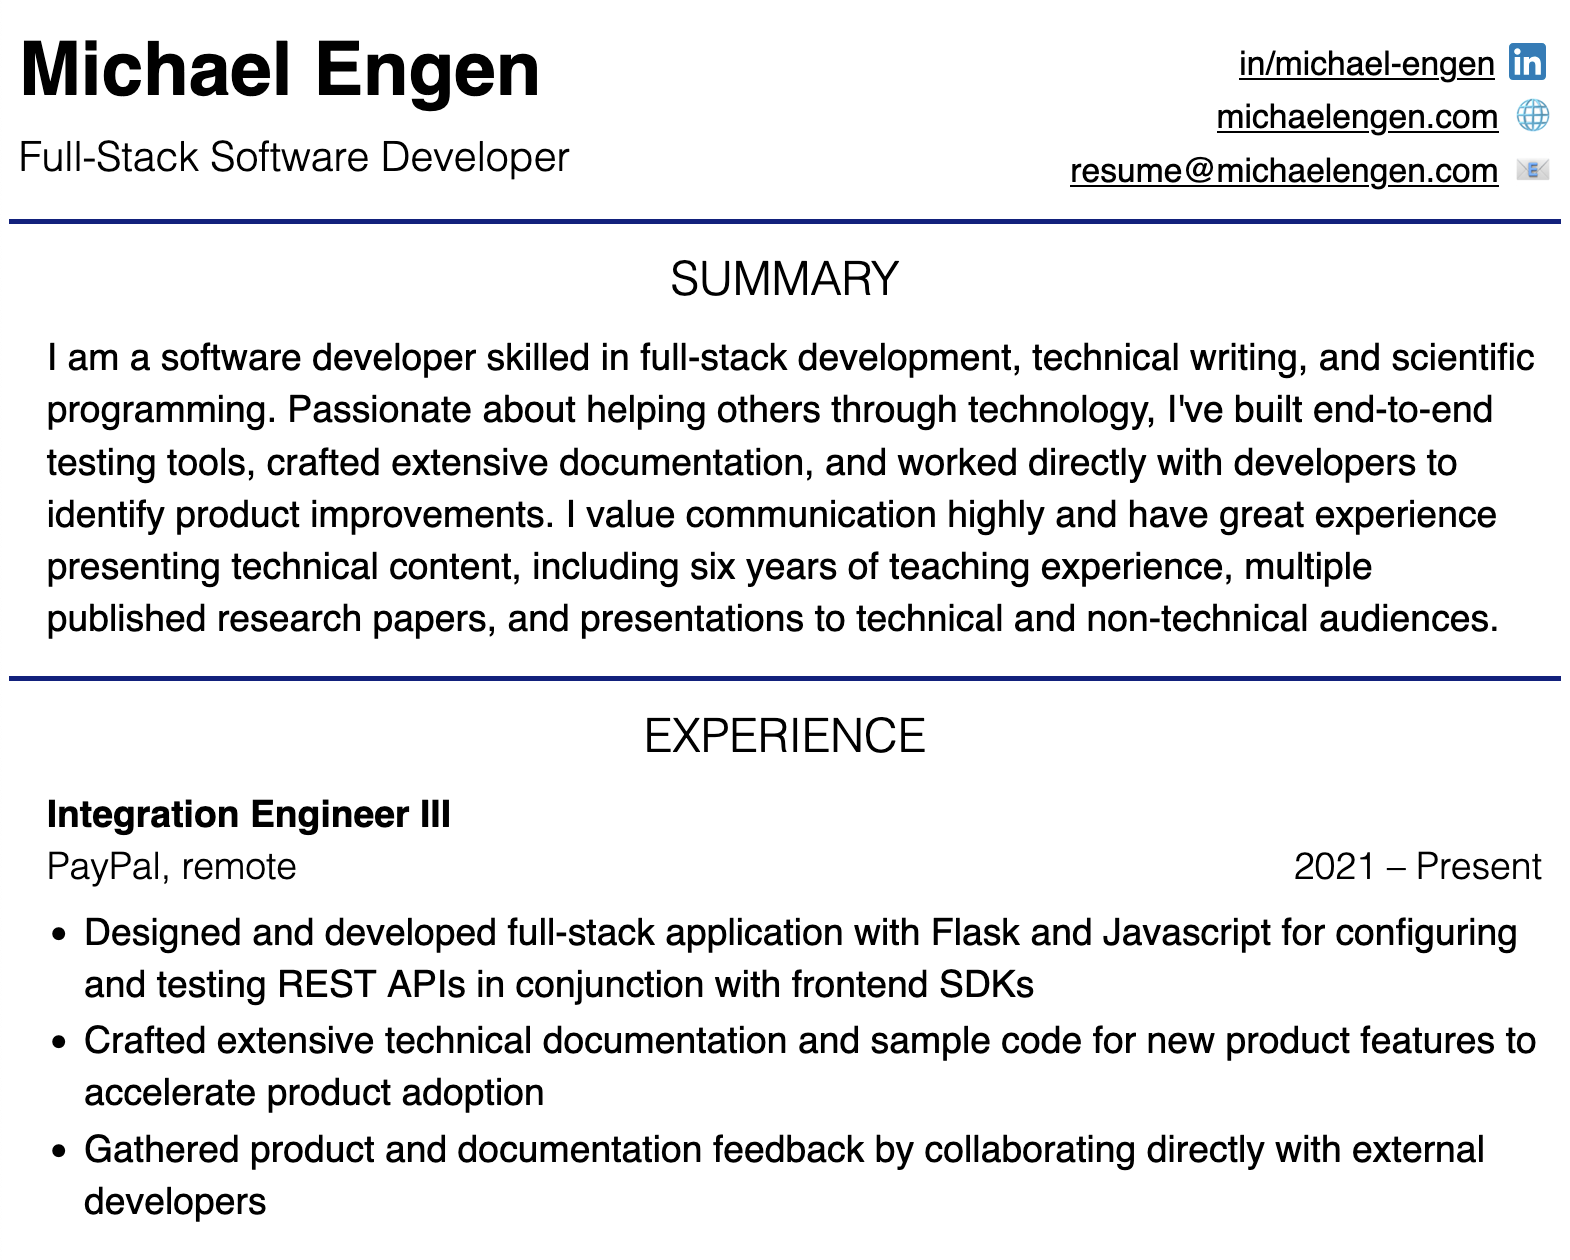
I've spent the last few years learning more about front-end web development, so, this time around, I reached for HTML and CSS. Behold, my resume (website)!

In this article, I'll walk through some of the decisions I made as well as some challenges I faced along the way.
The Benefits of HTML and CSS
#The immediate benefit of building my resume with web-native technologies is that I can host my resume online! Web-native documents permit flexible layouts, enabling my resume to look good across a wide variety of browser and font sizes. HTML's many semantic elements provide meaningful structure to the document, aiding accessibility.
CSS has improved tremendously in recent years, incorporating many new language features that benefit both development and its formatting capabilities. The advent of native CSS nesting makes authoring CSS much more pleasant, and grid-based layouts are a simple yet powerful means for designing user interfaces. CSS's ubiquity, along with a heightened enthusiasm from the community, also brings a wealth of excellent documentation, guides, and discussion, which I've found invaluable during my research.
But, I Can't Upload HTML to Indeed
#True, Indeed and other job platforms don't accept HTML documents, and a recent straw poll among my unwilling friends concluded that a resume.html email attachment is definitely a virus.
Thankfully, producing a beautiful glossy PDF can be as simple as opening the file in a browser and printing to a PDF.
I can tweak the precise layout of the printed PDF, e.g., to ensure it fits on one page, using CSS's print styles without affecting the web layout.
Building It
#One could just open up resume.html and go ham, but that isn't the best development experience.
Brad Frost wrote about his enjoyment of this unencumbered approach to building websites, although he too noted "ergononmic inefficiences".
Thankfully, there is a lot of great tooling available in the form of static site generators, whose principal purpose is to meld data, structure, and styling into files for the web. I've chosen to use Eleventy, a static site generator written in JavaScript that uses plain JS for its configuration, but there are many options for JS and other languages. The process has three principal steps:
- Writing the resume's data.
- Structuring the data with HTML.
- Styling the structure with CSS.
The Data
#Eleventy supports a wide variety of data file types, but I've opted to use JSON for its simplicity. The JSON Resume schema provides a solid foundation for our content, and there are hundreds of "JSON Resume" themes publicly available that use a wide variety of build systems. I did add some new fields in cases where I wanted to include something outside the schema, e.g., my research focus during my graduate studies:
{
  "education": [
    {
      "studyType": "Doctor of Philosophy",
      "area": "Mathematics",
      "focus": "Combinatorics", // New!
      // ...
    },
    // ...
  ],
  // ...
}
This data will be funneled into Eleventy's data cascade, which in turn will pour into its HTML templates.
The Markup
#Eleventy will read the data at build time, inserting it into HTML templates using a template language.
By default, Eleventy uses the Liquid templating language, and its straightforward interface makes it well suited for this use case.
The primary Liquid syntax needed is minimal. In a .liquid file,
- the snippet
{{ myVariable }}will be replaced by themyVariableand - the snippet
{% include "file.ext" %}will be replaced by the contents of"file.ext", which may itself be a template.
Our document's <head> requires only these constructs:
<head>
  <meta charset="UTF-8" />
  <meta
    name="viewport"
    content="width=device-width, initial-scale=1"
  />
  <style>
    {% include "styles.css" %}
  </style>
  <title>
    {{ resume.basics.name }}'s Resume
  </title>
</head>
In addition to some HTML boilerplate, I've inlined my stylesheet, so that my resume is contained to just one file. My resume has four sections:
- header/contact info,
- a summary,
- relevant work experience, and
- formal education.
I've marked up these sections each with their own template, passing in just the data needed for that section:
<body>
  {%
    include "components/header.liquid",
    basics: resume.basics
  %}
  <main>
    {%
      include "components/summary.liquid",
      summary: resume.basics.summary
    %}
    {%
      include "components/experience.liquid",
      work: resume.work
    %}
    {%
      include "components/education.liquid",
      education: resume.education
    %}
  </main>
</body>
In each of the above {% include %} statements, I've passed just the resume data necessary to "render" the template.
The referenced templates can be very simple, like with my summary:
<section>
  <h2>Summary</h2>
  <p>{{ summary }}</p>
</section>
Or, they can be more involved, like this template for my work experience, which loops through the work array and includes an option for dates to be displayed through a period, like "Summer 2017", rather than a range.
<section>
<h2>Experience</h2>
{% for work in resume.work %}
<section>
<header>
<h3>{{ work.position }}</h3>
<span>{{ work.name }}</span>
<span class="date">
{% if work.period %}
{{ work.period }}
{% else %}
{{ work.startDate }} – {{ work.endDate }}
{% endif %}
</span>
</header>
<ul>
{% for highlight in work.highlights %}
<li>{{ highlight }}</li>
{% endfor %}
</ul>
</section>
{% endfor %}
</section>The Design
#When designing my resume's layout, I wanted a single content column to provide a natural reading order, while also keeping the width of the primary content short enough as to not impair readability. I opted to place the section labels in a gutter on the page's left side, allowing my content to fill most, but not all, of the page's width.
CSS can solve this in a few ways, but first let's look at the basic structure of the resume with most of the content removed:
<main>
  <section>
    <h2>Experience</h2>
    <section>
      <!-- Much experience -->
    </section>
    <section>
      <!-- Wow -->
    </section>
  </section>
  <section>
    <h2>Education</h2>
    <section>
      <!-- University -->
    </section>
    <section>
      <!-- College, maybe -->
    </section>
  </section>
</main>
I want the section-label gutter column to only be as wide as its content, which can be achieved by placing the <h2> labels into the same column and setting its width to max-content, but the labels don't have a common parent!
Thankfully, they share a common grandparent, and each of that grandparent's children may inherit the grandparent's columns through a subgrid: grid-template-columns: subgrid;.

main {
  display: grid;
  grid-template-columns: max-content 1fr;

  >section {
    grid-column: 1 / 3;

    display: grid;
    grid-template-columns: subgrid;
    justify-items: start;
    align-items: start;

    h2 {
      grid-column: 1 / span 1;
    }
    section {
      grid-column: 2 / 3;
    }
  }
}
Additionally, I wanted the section labels to collapse to be inline with the resume's content for narrow viewports, which only required changing a few of the grid-layout parameters in a media query.

main {
  >section {
    @media screen and (max-width: 50rem) {
      h2 {
        grid-column-end: span 2;
        justify-self: center;
      }
      section {
        grid-column-start: 1;
      }
    }
  }
}
Development Experience
#With all this in place, I'll outline my "development experience"—what is required to edit and distribute my resume in this format?
Once set up, I produce clean builds of my resume with npx @11ty/eleventy or npm run build, which produces the single HTML resume file.
While I'm editing my resume, Eleventy will stand up a local webserver on localhost:8080 with npx @11ty/eleventy --serve or npm run start.
This is handy as it includes functionality to reload the webpage in response to changes in the source, so any edits are reflected when the content is saved.
The local server is also helpful for producing the PDF version of my resume, as we can use web automation tools to print-to-PDF from the command line!
I use this short print.js script that uses Puppeteer to make the PDF, and I run it with node print.js.
import puppeteer from "puppeteer";

async function printPDF() {
  const browser = await puppeteer.launch({ headless: true });
  const page = await browser.newPage();
  await page.goto('http://localhost:8080/', { waitUntil: 'networkidle0' });
  await page.pdf({ format: 'letter', path: './resume.pdf' });
  await browser.close();
}

await printPDF();
For those interested, I've uploaded this project to GitHub. If you'd like to see other approaches to HTML resumes, see these posts by Eric Bailey, Max Böck, and David Reed. If you have any feedback, I'm available on Mastodon. Thanks for reading!